Summary: This guide covers everything you need to know about Schedule 1 console commands and cheats, including how to install and activate them, a complete list of available commands, and tips for using them effectively.
Join us as we explore Schedule 1 console commands and cheats.

Table of Contents

Schedule 1
- Download MelonLoader:MelonLoader
- Install Mods:Nexus Mods
- Schedule1ConsoleUnlocker
- Console Mod
.dll filesmodsMod Manager
- Launch the Game and Use Console Commands:Schedule 1F8
- Alternative Cheats:Cheat EngineCT files
Schedule 1
Now that you know how to set up and use console commands in Schedule I, let’s dive into the list of available commands to help you get the most out of your gameplay.

Schedule 1
| Command | Description |
|---|---|
addemployee |
Adds an employee to help automate drug production. Example: addemployee place. |
addxp |
Adds XP to level up. Example: addxp 5000. |
bind |
Binds a key to a command. Example: bind t 'settime 1230'. |
changebalance |
Adds to your online balance. Example: changebalance 5000. |
changecash |
Adds cash to your character. Example: changecash 5000. |
clearbinds |
Clears all key bindings. |
clearinventory |
Empties your inventory. |
clearwanted |
Removes your wanted level. |
enable |
Enables a game object. Example: enable pp. |
disable |
Disables a game object. Example: disable pp. |
freecam |
Activates free camera mode. |
give |
Gives you an item. Example: give watering_can. |
growplants |
Instantly grows all plants. |
hideui |
Hides all on-screen UI elements. |
raisewanted |
Raises your wanted level. |
lowerwanted |
Lowers your wanted level. |
packageproduct |
Packages product in your hand. Example: packageproduct jar. |
save |
Saves the game. |
setdiscovered |
Marks a product as discovered. Example: setdiscovered ogkush. |
setemotion |
Sets your character’s facial expression. Example: setemotion cheery. |
setenergy |
Sets your energy level. Example: setenergy 100. |
sethealth |
Sets your health. Example: sethealth 100. |
setjumpforce |
Adjusts jump power. Example: setjumpforce 1. |
setlawintensity |
Changes police intensity. Example: setlawintensity 6. |
setmovespeed |
Changes movement speed. Example: setmovespeed 1. |
setowned |
Marks a property as yours. Example: setowned laundromat. |
setquality |
Changes item quality. Example: setquality heavenly. |
setquestentrystate |
Alters a quest state. Example: setquestentrystate <quest name>. |
setrelationship |
Sets NPC relationship level. Example: setrelationship <npc_id> 5. |
setstaminareserve |
Increases stamina reserve. Example: setstaminareserve 200. |
settime |
Changes in-game time. Example: settime 1530. |
settimescale |
Adjusts game time speed. Example: settimescale 1. |
setunlocked |
Unlocks an NPC. Example: setunlocked <npc_id>. |
setvar |
Sets a variable. Example: setvar <variable> <value>. |
spawnvehicle |
Spawns a vehicle. Example: spawnvehicle shitbox. |
teleport |
Teleports you. Example: teleport townhall. |
unhideui |
Restores hidden UI. |
Schedule 1
Now that you’re familiar with the full list of console commands, let’s go over how to use them effectively within the game to enhance your experience.

Console commands allow you to modify gameplay, unlock cheats, and streamline your experience. Here’s how to enable and use them in both the full version and demo version of Schedule 1.
Using Console Commands in the Full Version
-
Launch the Game
Start Schedule 1 as usual. -
Open the Settings Menu
PressESC, then select Settings from the pause menu. -
Enable Console Commands
Under the Game tab, toggle Console Commands to ON. -
Open the Console Window
Press the tilde key (~) on your keyboard to bring up the command console. -
Enter and Run Commands
Type any console command (e.g.,addxp 5000) and press Enter. The cheat will apply immediately.
Using Console Commands in the Demo Version
The demo version requires additional setup to enable cheats:
Step 1: Install MelonLoader
-
Download MelonLoader from its official site.
-
Install it into your Schedule 1 directory following the instructions provided.
Step 2: Add Console Plugins
-
Visit Nexus Mods and download the required plugins for Schedule 1.
-
Extract the plugin files into the MelonLoader folder.
Step 3: Launch the Game and Open Console
-
Restart Schedule 1.
-
Press
F8in-game to open the console interface. -
Enter your desired commands as in the full version.
Alternative: Use Cheat Engine for Simple Cheats
If you prefer a more straightforward option:
-
Download Cheat Engine from cheatengine.org.
-
Download and open the matching CT files for Schedule 1.
-
Use the built-in cheats to modify XP, money, stats, and more.
Once you’ve set up the necessary mods and tools, here’s how to open and use the console in Schedule 1 to input your desired commands.
Schedule 1
1. Install MelonLoader
Download from the official site.
Install it to your Schedule 1 game folder.
2.Launch the Game Once
This creates the required Mods folder.
3.Install Console Unlocker
Download the Schedule One Console Unlocker mod from NexusMods.
Extract the .dll file and place it in the Mods folder.
4.(Optional) Add Console Mod
For improved stability, install the Schedule One Console mod the same way.
Open the Console
Launch the game and press F8 to open the console.
After you’ve successfully set up and opened the console, you can further enhance your gameplay experience in Schedule 1 by using modding apps to unlock additional features and customization.
Schedule 1
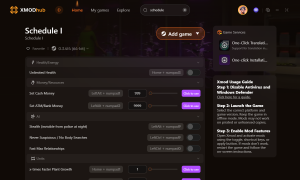
- Download the Xmod App

xmod download - Search for Schedule ISchedule I

Schedule 1 - Launch the Game
- Activate Your Mods

schedule 1 mods
Schedule 1
Schedule 1